MetaBrain Help & Guide
Everything you need to get the most out of MetaBrain
Contents
Quick Start
What MetaBrain does
MetaBrain writes sale-ready metadata for microstock: an SEO-optimised title, a description, and a ranked keyword set for every photo, video, vector illustration, or music track you drop in.* It does not stop at the metadata either — export as CSV in each agency's own column layout, embed it directly into the file, or deliver straight to the agency over FTP/SFTP. One file costs one credit. What used to take ten minutes of manual tagging per file takes seconds.
Start in 30 seconds — no setup
1. Open metabrain.online/studio in any modern browser (Mac, Windows, Linux), or launch the macOS desktop App.
2. Sign in with Google.
3. Drop your files. That is genuinely all: Mode A is selected by default and needs zero preparation — no reference images, no keyword blocks, no settings. In Studio, processing starts automatically the moment files land (two files at a time); in the App, press the main action button.
4. Review the result cards, edit anything you like, export.
Everything else on this page — Modes B/C/D, keyword blocks, trend scores — is optional tooling for power users. You can ship your first batch without reading further.
Studio vs Desktop App
Both share the same AI backend and produce identical quality. Studio (web) — no installation, runs everywhere, and includes AI brand detection (Detect IP). App (macOS) — adds direct metadata embedding into your files (Write to Files), the IP Scanner badge, and native folder drag-and-drop. Keyword blocks, learned corrections, and history sync between the two automatically.
Credits & plans
One processed file = one credit. Free — 20 credits at signup, no card required. Starter — 150 credits/month ($6), adds Correction Intelligence and Ground Truth. Hobby — 300 credits/month ($9), adds processing history, trend briefs and direct agency upload. Pro — 900 credits/month ($19), adds portfolio analytics and the local AI model. Credits Pack — +500 for $15, one-time, never expires, available on Hobby and Pro. On Starter and above the first Ground-Truth correction of each image is free (see "Steering the AI"). The monthly allowance restarts on each billing date and its unused part does not roll over; bonus credits (sign-up, packs, referrals) never expire and are spent after the allowance.
Mode A — Universal (default)
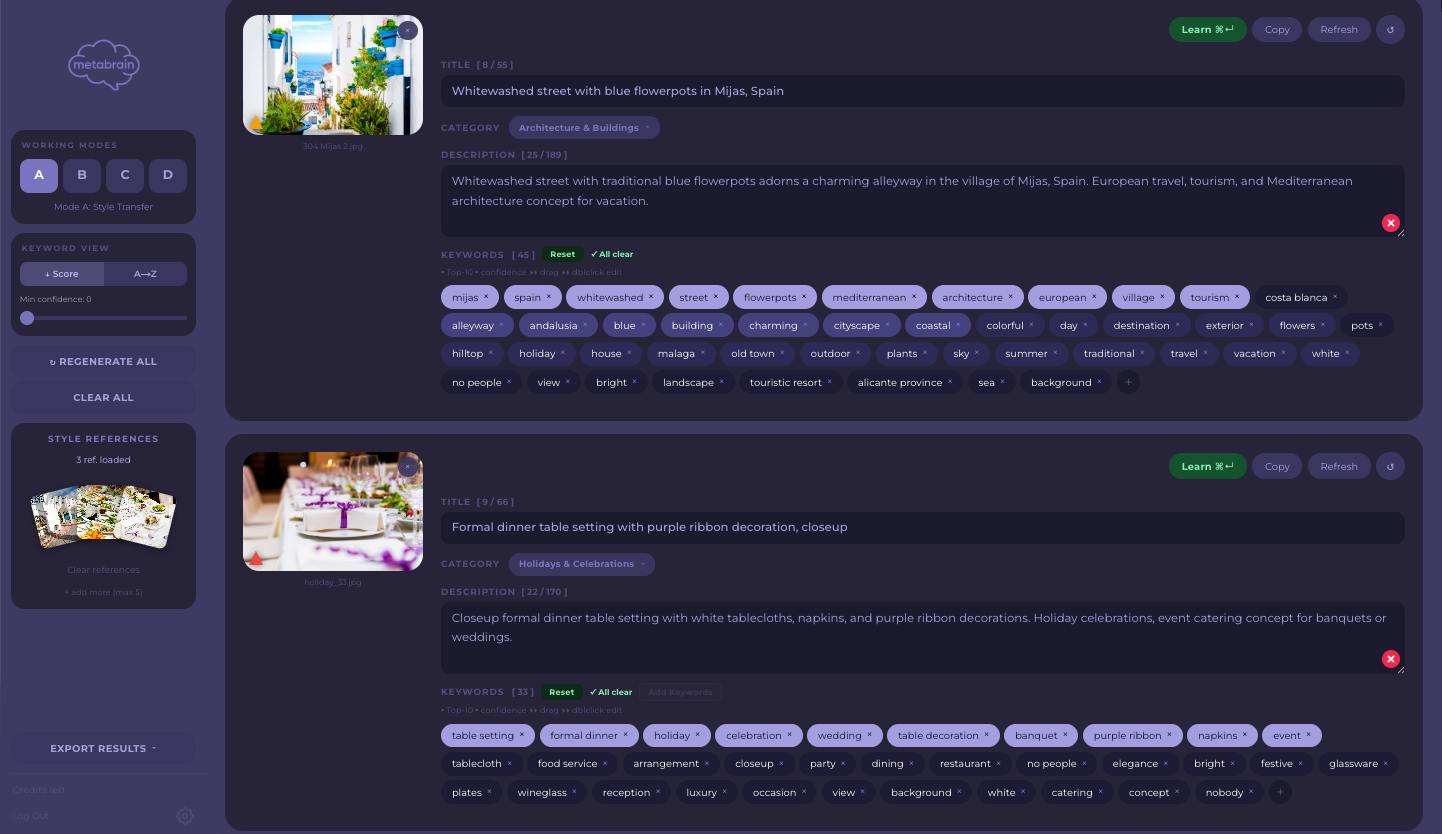
The "just drop files" mode
Mode A is the default working mode and the one you will use most of the time. It needs nothing but your files — no reference images, no keyword blocks, no configuration. Drop a photo, a video, a vector, or a music track: the AI reads the actual content (or, for audio, the measured facts — see "Music & Audio") and writes a complete metadata set from scratch.*
If you remember one thing from this guide: open Studio, stay in Mode A, drop files.
Optional: style references
The sidebar accepts up to 10 reference images. This is an optional fine-tuning tool: references nudge the keyword vocabulary towards the tone of a series — documentary, commercial, fine-art — without changing what the AI sees in the main file.* Most users never need them, and results without references are in no way inferior: the AI simply works from the image itself.
When Mode A is the right choice
Single files, small mixed batches, and anything that does not fall into a clear repeating niche. For high-volume niche production, see Modes B and D. For a series of near-identical shots, see Mode C.
Output
A ranked keyword set (up to 49 by default — adjustable from 20 to 80 in Output Settings), a sentence-case title, and a factual description built around buyer intent.*
Mode B — Keyword Blocks
What it is
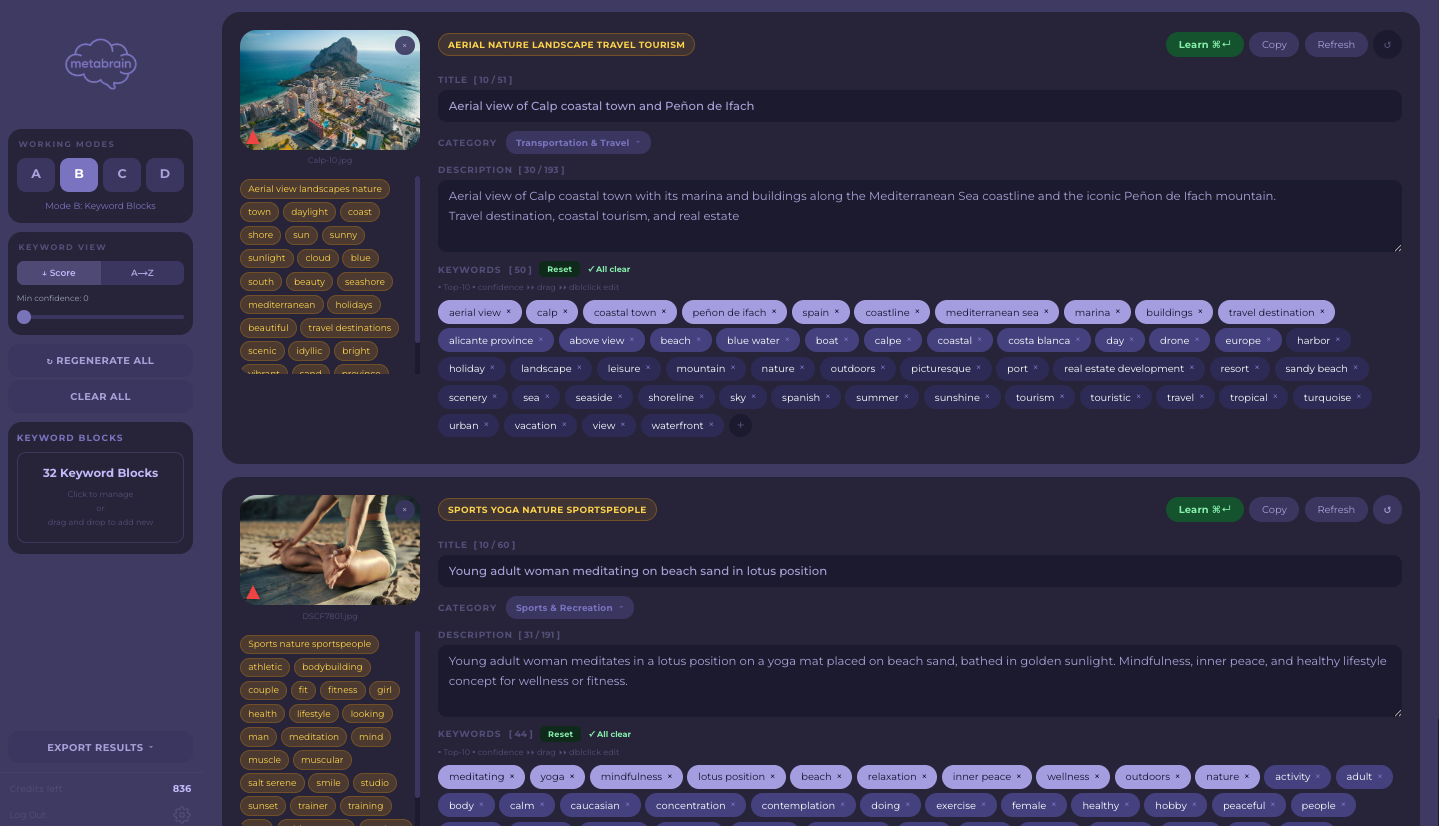
Mode B layers your own keyword library on top of the AI. A block is a themed word list — "Food Photography", "Travel — Mountains", "Business Technology". For each image, MetaBrain automatically picks the best-matching block* and blends its vocabulary into generation. The payoff: consistent niche wording across your whole catalogue.
Creating blocks in Studio
Studio has a built-in block editor in the sidebar: create a block, give it a descriptive English theme name, add keywords, save. Blocks live in your account and sync automatically with the desktop App — build your library once, use it everywhere.
Importing .txt blocks (App)
The desktop App also imports plain .txt files — one keyword per line. The filename is the theme name, so use descriptive English noun phrases: "Business portrait team.txt", never "block1.txt". An optional first line sharpens matching between similar-looking niches:
DESCRIPTION: Lifestyle food photography — warm tones, cafe settingsfood photographycafelatte artbaristaKeywords are lowercased and de-duplicated on import.
📌 Naming rule (important)
A block is selected by its theme name, so that name must describe the theme precisely and specifically — "Aerial nature landscape", "Business handshake in office" — never vague or garbled names like "block1", "misc", or a random string of words. The AI matches every image against these names: a vague, generic, or misleading name makes the block attach to the wrong images or be skipped entirely (no match). In the App the theme name is the .txt filename; in Studio it is the block name you type. Getting the name right is the single biggest factor in whether a block helps or hurts your results.
Keyword rules
Use single words per line — enter "business" and "meeting" as two separate lines, not "business meeting". The AI builds effective two-word phrases on its own where they help search performance.
No matching block
If no block fits the image, MetaBrain falls back to pure AI analysis — the same quality you would get in Mode A.* Nothing breaks; you simply get an unassisted result.
When to use it
Photographers with established niches who process many similar images regularly. Build blocks once, reuse forever — Mode B is the most efficient path for high-volume single-image workflows.
Mode C — Similars
What it is
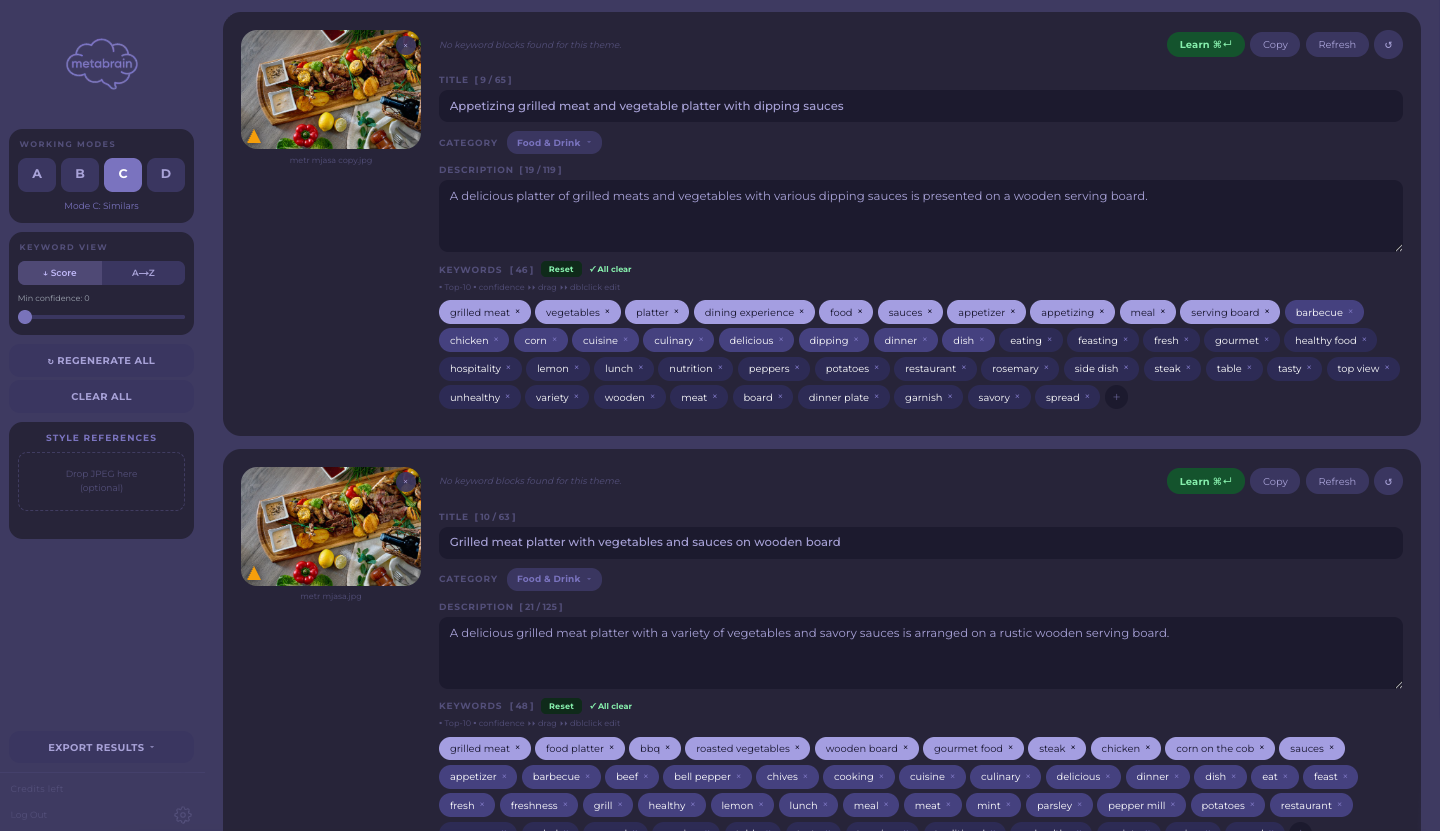
Mode C is built for batches of near-identical shots — the same scene from slightly different angles, moments, or lighting. Every title stays what a buyer would search for and differs through what that particular frame shows (its action, its part of the place, its people, a prop), while the second sentence of each description rotates a Focus Point (use case, concept, place, subject detail, moment, story). Records come out distinct*, which protects you from duplicate-content rejections at the agencies, without spending the title on colour or lighting.
When to use it
You have 3–50 shots from one session that are visually similar but all need to be submitted: bracketed exposures, model poses, sports sequences, food styling variations.
How to use it
1. Load keyword blocks in the sidebar (same library as Mode B).
2. Drop the batch of similar images into the grid.
3. Start processing.
Each image gets its own perspective variation woven into the prompt — titles and descriptions differ even for nearly identical frames.*
Output
Unique titles and descriptions across the whole batch; keyword count follows your Output Settings (up to 49 by default).
Mode D — Batch Grid
What it is
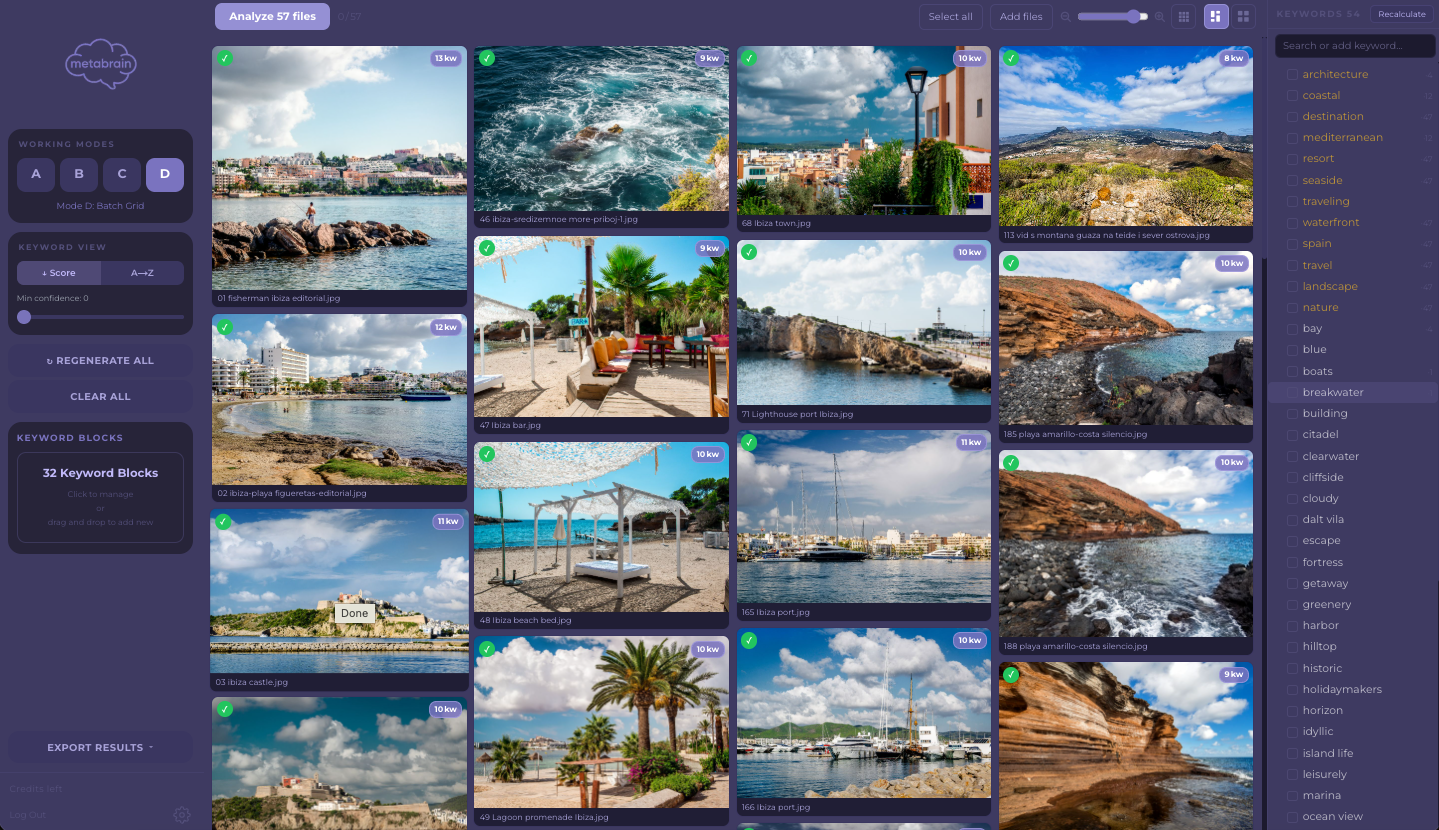
Mode D processes a large batch of unrelated images at once. Each image gets its own fully independent title, description, and keyword set.* Keyword blocks from the sidebar act as vocabulary pools the AI draws from when relevant.*
When to use it
The workhorse for production: process an entire shoot or a catalogue dump in one session. There is no upper limit on batch size.
Reordering thumbnails
Drag any thumbnail onto another to reorder the batch before or after processing — the grid updates instantly. Use it to group similar shots or restore your original shoot sequence.
Sorting results
The A→Z button sorts all result cards alphabetically by filename — handy for matching results to your folder structure.
Detail popup
Double-click any card to open the detail view: full-size preview, Category selector, and Title/Description fields. Generate Title & Description runs AI on that single image. Edits made in the popup are saved back to the card — and in Mode D, pressing Save in this window is what writes the card to your History.
Regenerating individual cards
The Regenerate button on any card re-runs AI for just that image without touching the rest of the batch.*
Editorial Pre-Selection
What it is
With Editorial Mode enabled in Settings (available in both the App and Studio), dropping files shows an interactive pre-selection grid before AI processing starts. You mark which files should be treated as editorial — the rest are processed as standard commercial images.

How to use it
1. Enable Editorial Mode in Settings.
2. Drop your files.
3. A grid appears — click any thumbnail to toggle its editorial status.
4. Use Select All / Clear for bulk marking.
5. Start the analysis — marked files get editorial metadata, unmarked files get standard commercial metadata.
You can drop additional files while the grid is open; current selections are preserved, and duplicates (same path + size) are skipped automatically.
What "editorial" metadata means
Editorial-marked files receive a different AI treatment:
- The capture date (from EXIF) is added to the title
- The description is written as a factual who/what/where caption rather than commercial copy
- Keywords lean towards documentation and reportage
- The Editorial flag is set automatically in all CSV exports
Output Settings
Make the output fit your pipeline
Settings → Output controls the shape of every generation, in both Studio and the App:
- Title — cap by word count (5–15 words) or switch to a character-based cap for agencies with strict character limits
- Description — target length in characters
- Keywords — target count, from 20 to 80 (default 49)
Quality-first by default
By default the keyword number is a ceiling, not a quota: MetaBrain will not pad the list with weak filler just to hit a number.* If your workflow requires an exact count, enable the strict-count option and the AI will deliver exactly the number you set.
Relevance Scores
Every keyword is scored
Each generated keyword carries a relevance score from 0 to 100 — how central it is to what a buyer would type when searching for this exact file.* The chip shading follows the score: bright chips (80+) are core terms, mid-tone chips (50–79) are supporting long-tail terms, and chips below your threshold are dimmed.
The threshold filter
The threshold slider in the sidebar sets your personal cut-off. Chips below it dim, and the [ N ] counter on each card shows how many keywords pass. Use it to triage the weak tail at a glance: review the dim chips, keep the useful ones, delete the rest before export.
Steering the AI (Ground Truth)
You control the context
The AI makes a first guess about what is in an image — and sometimes it guesses wrong. You can override it. On any finished result card, click Regenerate (App) / Refresh (Studio) to open the Ground Truth panel: a free-text box where you state exactly what the AI misread. Your words become the source of truth for the next generation.
What you can correct
Type any fact the AI got wrong — for example:*
- Demographics — age, gender, ethnicity, number of people ("two senior women, not one young man")
- Emotion — "anxious, not happy"
- Setting and location — "hospital waiting room in Lisbon, not a generic office"
- Commercial intent — what the shot is really *for* ("about online banking security, not just a person at a laptop")
These facts OVERRIDE the visual interpretation. The AI rewrites the title and description and re-ranks the keywords as if your facts are true — with no hedging ("appears to", "seems") and without contradicting you.
Surgical, not destructive
A correction changes only what you flagged. Everything the previous result got right is kept — the full keyword count, correctly-read emotion and composition, lighting and setting. You will not lose a good result by fixing one detail. Leave the box empty and click Regenerate to simply re-roll the same image.
Apply to a whole theme (Modes C and D)
In the batch modes, tick Apply to whole theme before regenerating. The same correction is pushed to every image that shares that keyword block, and they are all regenerated together — fix one misread, fix the whole set.
Your first correction is free
Ground Truth is part of the Starter plan and above; on Free, Regenerate / Refresh still works, just without the hint box. The first Ground Truth regeneration of each image does not cost a credit. While it is available, a green First correction free badge sits next to the Regenerate button. After you spend it, further regenerations of that same image cost one credit, as usual.
Correction Intelligence
What it is
Included from the Starter plan. On Free your edits are still recorded, and the rules start working the moment you upgrade. Correction Intelligence (CI) is a learning system that watches how you edit AI results and turns your edits into personal rules that improve future generations. The more you correct, the better MetaBrain fits your niche and taste.
How to teach it
Edit a result — delete keywords you never want, add ones the AI missed — then press Learn on the card (available in both the App and Studio). Your changes are saved as correction rules and injected into future AI requests automatically. In the App, `Cmd+Enter` learns from all visible cards at once.
Three rule types
Global rules — apply to every image. Example: you always delete "candid" — CI stops generating it.
Theme rules — apply when the image matches a keyword-block theme. Words you consistently remove from a theme get banned; words you add get suggested.
Context rules — used where there are no blocks (Mode A): MetaBrain derives the context from the top keywords and groups corrections across similar contexts.
Correction Stats (App)
Settings → Correction Stats shows your full rule dashboard: Frequent Hallucinations (keywords the AI keeps generating that you keep deleting — blacklisted), Missing Words (keywords you add that the AI misses), and an AI Accuracy Trend sparkline. Click any entry to review or delete it; you can also reset individual rules or everything. In Studio, the Corrections page serves the same purpose.
Best Practices
Buyer intent — the most important concept
Stock agencies rank results by relevance to a buyer's search query. Buyers search for what they need to communicate, not what they see in a photo.
❌ Wrong approach: "woman, smartphone, kitchen, smiling"
✅ Right approach: "adult woman making online payment at home kitchen"
MetaBrain is calibrated to think about buyer intent first. Every title answers WHO does WHAT, WHY, and WHERE. Every keyword set prioritises commercial use cases over visual inventory.
Put real facts in the filename
The filename is read as a trusted hint — especially for places. A file named "lisbon-alfama-sunset.jpg" puts Lisbon into the title and keywords; "IMG_4382.jpg" tells the AI nothing. Locations are exactly what the AI cannot guess from pixels alone, so name files with the real place, event, or subject whenever you can.
Phrase splitting (comma rule)
Stock search engines index individual words as well as phrases. MetaBrain outputs keyword phrases to maximise surface area:
`"online banking"` → indexed as "online" AND "banking" AND "online banking"
This multiplies the number of searches your file can appear in. Do not break MetaBrain's phrases apart — the comma-separated format is intentional.
Category field
MetaBrain assigns one of 18 standard stock categories (e.g. "Business & Finance", "Landscape & Nature") automatically; you can override it on the card. Correct category assignment noticeably improves placement in agency browse pages.
Editorial flag
Toggle Editorial for images that cannot be licensed commercially — recognisable people without model releases, branded products, news events. This prevents rejections for unlicensed commercial use.
Editing Keywords
Deleting and adding
Click the × on any chip to remove it. Click the + Add keyword area at the end of the list, type, and confirm with Enter or a comma. Double-click a chip to edit its text in place.
Why two-word keyword phrases?
Many keywords come out as two-word phrases ("family cooking", "healthy eating") rather than single words. This is intentional: buyers search with phrases, and a phrase matches their query precisely, while a bare noun like "family" competes with millions of files. Concept phrases occupy the top positions, where agency algorithms weigh relevance most; broad single words sit lower to cover short queries. Adobe Stock, Shutterstock, and Getty fully support multi-word keywords. Tags longer than two words can look like spam to reviewers, so MetaBrain caps every keyword at two words.
Reordering chips & Power Keywords
Drag any chip to a new position — position order is what agencies see. The first 10 positions carry the most search weight; the App highlights them as gold Power Keywords. If something needs promoting, drag it into the top ten.
Editing the title and description
Click directly on the title or description text to edit it inline. Press Enter or click elsewhere to confirm.
Category field
Every card includes a Category field. The AI picks one of 18 standard microstock categories automatically; click it to choose another. The category is included in all export formats: CSV, Word, XMP, and Clipboard.
Bulk selection (App)
In the App, each card has a checkbox. Select several cards to Apply Theme (inject a keyword block into all of them) or Regenerate them together (a confirmation dialog warns that manual edits will be lost). Select All / Deselect All live in the sidebar.
Keyboard shortcuts
`Cmd+Z` — undo on the last modified card
`Cmd+Enter` — learn from all visible cards (App)
`Escape` — cancel the current edit
Undo & Edit History
Per-card undo (App)
In the App, every result card has a round ↺ button. Each card stores up to 5 undo steps, independent of other cards. A snapshot is captured automatically before AI generation, before you edit the title or description, and before any chip change. In Mode D, the ↺ button lives in the detail popup.
Reset to original (Studio)
In Studio, the ↺ Reset button on each card returns the card to the original AI output in one step — useful when an editing session went sideways and you want the clean starting point back.
Keyboard shortcut
`Cmd+Z` — undo on the last card you modified (Modes A/B/C) or on all selected thumbnails (Mode D, App). Does not interfere with native `Cmd+Z` inside text fields.
Technical Pre-scan
What it does
Before AI processing begins, MetaBrain runs a lightweight technical analysis on each image, in a background thread that never blocks the UI. Results appear as coloured badges on result cards.
Five checks
Resolution — image should be ≥ 4 MP. 4–8 MP triggers a warning; below 4 MP is an error. Shutterstock requires 4 MP minimum; Alamy and Getty prefer 8 MP+.
Sharpness — measures edge contrast in the centre crop. Low score = blurry subject (camera shake, missed focus, heavy noise reduction). Artistic bokeh may also trigger it — use your judgement.
Exposure — counts blown highlights and clipped shadows; both are hard to fix in post and a common rejection reason.
Noise — measures digital grain, typically from high ISO. Excessive noise is a frequent rejection trigger at larger print sizes.
Colour Cast — detects a dominant tint from incorrect white balance. Strong casts — especially in skin tones — are a rejection risk.
Error vs Warning
Error (✗) — value is outside what agencies typically accept. High rejection probability; fix or exclude before uploading.
Warning (⚠) — borderline value. The image may still pass, but review it manually. Conservative agencies (Getty, Alamy) apply stricter standards than volume platforms.
Where results appear
Modes A/B/C — a red ✗ N issues or amber ⚠ N warnings badge on the card. Mode D — a compact badge on the thumbnail; double-click to see the full table with values.
The pre-scan is advisory only — MetaBrain never blocks or skips files that fail checks.
IP Scanner & Brand Detection
IP Scanner (App)
An optional tool in the App (Settings → Tools → IP Scanner). When enabled, the AI checks each image for identifiable brands, trademarks, licence plates, and named establishments. If any are found, an amber ⚠ Editorial badge appears on the card — hover for a summary, click to see the detected objects overlaid on the thumbnail. With the scanner off, the badge is simply hidden.
Detect IP (Studio) — free
In Studio, every finished card has a Detect IP button: a free scan for logos, brand marks, licence plates, and named establishments that would require a property release (JPEG, PNG, WebP). Found objects are drawn as orange boxes directly on the thumbnail; View list shows every detected item by name, and you can re-run the scan after editing the image. If nothing is found, you get an explicit "No IP issues found".
Use the result to decide: submit as editorial, retouch the marked areas in your editor, or exclude the file.
What "Editorial" means here
Editorial content can be sold for news, educational, or documentary use, but not for advertising. Most agencies require a property release or an editorial licence for images with identifiable brands, storefronts, or public figures. All IP tools are informational — MetaBrain never rejects or modifies your files without you asking; you decide how to licence and submit.
Releases — Sign & Attach (beta)
What Releases is — and that it is free and standalone
Beta. The whole path — collect, sign, pre-flight, export, attach — works, and it is free. What is still being finished is the wording of the release document itself, the part an agency reads: read the finished document before you hand it over.
MetaBrain Releases is a separate tool for model, minor, and property releases: fill one in on your phone, have the subject read it and sign on screen, run it against each agency's rules, and export a submission-ready package.
It is free and it works entirely on its own. You do not need a paid MetaBrain plan, credits, or any other part of MetaBrain to use it, and there is no registration to get started — open it, pick a release type, and go. A MetaBrain account (the same Google sign-in as Studio) only becomes useful for two things: syncing your releases across devices, and attaching them to your frames (see the last block). Everything up to and including a signed, exported PDF works without an account at all.

The phone app — collect and sign
Open metabrain.online/releases on a phone and add it to the home screen — on iOS: Share → Add to Home Screen; on Android: the "Install" prompt. No App Store, no review wait. Once it has opened once it runs offline: on a shoot with no signal, the whole flow still works.
The wizard is six steps, one question per screen:
1. Type — model (adult), minor, or property.
2. Shoot — name, date, place (one tap adds GPS).
3. Data — three required fields; the rest is folded under "more".
4. Photos — a portrait of the subject, plus a photo of a government ID for mature content.
5. Signature — first a full-screen disclosure the subject reads in their own language (EN, ES, PT, RU); the "I have read and agree" button unlocks only once they have scrolled to the end. Then they sign with a finger or stylus. A signature typed in a font is rejected by every agency — a drawn one is accepted.
6. Done — pre-flight and export.
Pre-flight and agency-format packages
Before export, a live checklist runs the release against the current rules of Shutterstock, Adobe Stock, Pond5 and Alamy — one JPEG per person for Shutterstock, matching model and witness dates for Adobe, a guardian ID for minors, Gregorian dates, Latin-only contact fields. It shows exactly what to fix; it never blocks you.
Export gives you the shapes agencies want: the pages flattened into a single JPEG per person, plus a PDF. The document itself is always in English — the form these agencies accept without extra conditions — with the subject's language shown in a parallel column so they understand what they signed. The rules are maintained by the MetaBrain team and pushed to the app without an update.
Getty Images and iStock are not covered yet. They accept a release only on their own form — printed and signed in ink, or issued by one of the two apps they have approved. That is a rule about which form you use, not about how the release is written, so no change of wording gets past it. We are working on a route Getty accepts; meanwhile the app fills Getty’s own official form with the data you already entered and exports it ready to print, with the signature and date lines left empty for ink.
Attaching a release to your frames (this part uses MetaBrain)
This is the one place Releases connects to the rest of MetaBrain, and it is optional. In MetaBrain Studio (Releases tab) and the desktop App, a signed release can be linked to the actual image files it covers, and its release number written into the image metadata — `plus:ModelReleaseID`, `plus:ModelReleaseStatus`, `plus:PropertyReleaseStatus` and `Iptc4xmpExt:PersonInImage` in XMP. Agencies read those fields on upload. The release itself is still made and signed entirely in the free phone app — this step just carries the ID across to your catalogue.
Privacy, storage, and the legal line
A release holds a third party's personal data, so by default nothing leaves the device. The working copy lives in local storage; the finished PDF and JPEG go to your own Google Drive (scope `drive.file` — the app only sees files it created). Our server stores only metadata — release number, type, status, pre-flight result, template version, a document hash — never names, dates of birth, or ID scans. Copies are shared to the subject and to you through the system share sheet, straight from the device.
MetaBrain Releases helps a release meet agency submission requirements. It is not affiliated with any agency and it is not legal advice. Full overview: metabrain.online/model-release-app.
Inspector — Agency Rules & Spell Check
One click before export
Every result card has an Inspector button that audits the metadata against stock-agency requirements: title and description length, risky or banned terms, duplicate keywords — and spelling. A 160,000-word dictionary catches garbled keywords, including subtle cases like a missing or an extra trailing letter that spell checkers usually miss.
How to read it
The button shows an issue counter; ✓ All clear means nothing was found. Fix flagged issues before export — misspelled keywords are dead weight (nobody searches for them), and rule violations are avoidable rejections.
Trend Score
What it is
Trend Score is an optional tool (Settings → Tools → Trend Score). When enabled, a commercial-potential indicator appears on every result card. The score models earning potential = demand × (1 − market saturation): oversupplied commodity subjects (apple on white, generic handshake) score low even when the topic is popular.
Indicator components
① Gradient bar — the filled portion shows the score out of 100.
② Numeric score — colour-coded from bright (high) to muted (low).
③ Momentum arrow — ↑ Rising · → Stable · ↓ Declining
Score ranges
80–100 — Hot — high demand, trending now
60–79 — Rising — growing commercial interest
40–59 — Stable — consistent evergreen demand
0–39 — Niche / Declining — limited or shrinking audience
Full Trend Panel
Click the score bar to open the full Trend Panel for that image:
- Agency Brief matches — how many current agency shoot briefs this image's keywords match
- Demand keywords — high-demand terms already in your set
- Avoid zone — oversaturated keywords to remove or deprioritise
- Category saturation — how crowded this content category is
- Brief list — matched briefs with their subjects and freshness date
- Recommendations (+1 credit) — a personalised list of trending keywords to add to this specific image
Availability: the Trend Score itself is included on every plan, Free included. The brief with recommendations (the Recommendations button and the PDF brief) is available on Hobby and above.
Hover over the bar (without clicking) for a compact tooltip with 2–3 high-demand keywords not yet in your list.
Note
Trend Score is an estimate — it maps content category and keyword signals to microstock demand patterns, not real-time sales data. Verify against your own agency dashboards before making production decisions.
Video Support
Supported formats
MP4 and MOV work everywhere. The desktop App additionally handles AVI, MKV, and WebM. In Studio you can also drag in WMV, M4V, MTS, and MXF — as long as your browser can decode the codec inside.
How video processing works
MetaBrain extracts 5 frames across the timeline (at 10%, 30%, 50%, 70%, and 90%) and assembles them into a single collage. The AI analyses the collage to understand the full arc of the video* — not just one frozen frame — and writes footage-appropriate titles and keywords. One video costs one credit, same as an image.
ProRes and professional codecs
No browser can decode ProRes, DNxHD or CineForm, and that is a limit of the browser itself, not of Studio — the error message names the exact codec it found. The quickest way round it is the H.264 proxy your editing suite already writes: drop the proxy, then set Master file name in the export panel to the master's extension (mov, mxf) so the CSV names the file you actually upload. Otherwise transcode a copy with Shutter Encoder or HandBrake (both free, Windows/macOS/Linux), or process the master in the desktop App.
Best results
Videos take longer than images — the frames must be extracted and a larger payload analysed, so expect up to a few minutes for long clips; keep the tab open. Heavily edited clips with rapid cuts may produce lower-confidence results — consider processing a representative segment separately.
Music & Audio (beta)
What "beta" means here
Everything on this page works today. What is still growing: key detection needs a human on roughly one track in three (the field is always editable, and a key you pick by hand is the one that reaches the CSV), the shelf table behind the music Trend covers 104 measured phrases and keeps growing, and the catalogue analysis is App-only for now. Nothing is hidden behind the badge — it is there so you check the key and the loudness before you submit rather than after.
What happens when you drop a track
MetaBrain treats audio as music, not as a picture with a soundtrack. WAV, AIFF, MP3, M4A, AAC, FLAC and OGG are accepted. Before the AI sees anything, the track is MEASURED on your own machine: length and bar count, tempo, key and its Camelot code, integrated loudness (LUFS), loudness range, true peak (dBTP), sample rate, bit depth and channels. Those measurements are handed to the model as facts, so it describes your music instead of guessing numbers about it. What comes back is a title, a description and keywords written the way music is actually bought — by use case, mood, instrument and tempo. One track costs one credit, same as an image. Audio is processed in Mode A — in the desktop App and in Studio alike; the other modes work from keyword blocks and batch grids built for pictures.
The measured strip on the card
Under the description you get the strip: LEN with bar count, BPM with a one-click swap to the half/double reading, KEY as an editable picker with the Camelot code beside it, LUFS, LRA, PEAK and FMT. Everything measured is editable, because you know your own track better than any estimator does. Coloured chips name what a library would reject the file for — clipping, true peak over the limit, mono, DC offset, loudness far from the shelf — and each chip opens into four lines: what is wrong, where in the track, the fix with the number computed for your file, and which platforms actually care.
How accurate is the key detection
Honestly measured rather than claimed: 7 of 8 correct (88%) against the MIDI of real projects, and 60.4% exact / 69.0 weighted on the public GiantSteps set of 604 expert-annotated tracks — ahead of KeyFinder, behind Mixed In Key. Roughly one track in three needs a human, and nothing in the confidence number predicts which one, so the field is simply always editable. A key you pick by hand is treated as certain and goes to the CSV; a low-confidence estimate is left out of the export rather than shipped as a wrong number.
Delivery fields, cover art and cuts
Two folded tabs sit under the strip. Stock holds what a library asks for — category, genre, mood, instruments, vocals, use cases. Release holds what a distributor asks for — artist, ISRC, ISWC, writer splits, IPI, publisher, year, explicit flag and the AI disclosure that stores have shown in credits since April 2026. Anything your DAW already wrote into the file (artist, ISRC) is read from the file and never overwritten by the model. The cover slot checks the image against every store's rules at once: square, at least 1600×1600 for TuneCore, 3000×3000 recommended everywhere. Cuts bounce 15, 30 and 60-second versions aligned to the tempo grid, rounded down to whole bars so they end musically.
Writing tags into the file, and the CSV sheets
Write to Files puts the metadata inside the audio itself: ID3v2.4 for MP3/WAV/AIFF, Vorbis comments for FLAC/OGG, MP4 atoms for M4A, plus RIFF LIST-INFO (what Finder and Windows columns read) and a broadcast BWF chunk. An empty field never erases what you already had. For the agencies, the export menu holds one sheet per platform: Pond5 Music, Storyblocks Audio, Motion Array Audio, AudioJungle (Envato) and a distributor release sheet for DistroKid, TuneCore, CD Baby or Amuse. On a batch of tracks the picture agencies disappear from the menu, and on a batch of photos the music sheets do — you only ever see the sheets that fit what you loaded.
Who takes what — read this before you send
Pond5 takes WAV or AIFF only, stereo, under 10 minutes, and forbids spaces and dashes in the file name; it also needs a separate FTP password set in your dashboard. Storyblocks takes WAV or AIFF from 60 seconds — and their music licence is exclusive, so a track sent there cannot be sold anywhere else; the export menu marks that sheet so you know before the click. Motion Array wants a WAV 24-bit/48 kHz master with an MP3 preview and is non-exclusive. AudioJungle wants everything at 44.1 kHz/16-bit stereo and the preview as MP3 320 CBR. Envato paused new author sign-ups in 2021 and it is still paused — the sheet ships anyway for the authors already inside.
AudioJungle watermark and MP3 320
Envato is the only library that makes the author watermark the preview, and their rules are exact: required on anything two seconds or longer, heard every 10 seconds over 20 s, every 5 seconds on 10–20 s, every 2–3 seconds on 5–10 s, and once on anything shorter — with the sample unaltered, no pitch changes and no effects. AudioJungle watermark on previews… in the export menu does exactly that. We do not ship Envato's watermark file: it is their asset and they hand it to their own authors, so you point at your copy once and MetaBrain remembers it. Your master is never touched — the watermark goes on a separate preview, written as MP3 320 CBR, the format their upload form asks for. Convert tracks to MP3 320… does the same conversion on its own for any track.
Trend for music
A track has no subject, so the picture Trend Score means nothing for it. The music engine answers a different question — what to do with this track next — and every line comes from a measurement or the calendar: short versions a library licenses that you have not cut yet; loudness sitting below the −14…−9 LUFS band everything else is auditioned at, with the exact gap in dB; how many use-case words a brief could match on; your tempo against the band the genre is actually searched at; a seasonal window, because a Christmas cue uploaded in December missed its year and one uploaded in September did not; and how full the shelf your keywords name already is. Shelf sizes are measured on AudioJungle rather than guessed, and the advice only ever points at another word you chose — an empty shelf is not an opportunity if nobody searches for it.
Catalogue analysis (App)
Analyse a folder of tracks… in the export menu measures a whole folder of masters and maps the catalogue: which tempo and length cells are empty, whether everything sits in one key mode, how far levels jump between tracks, which seasons you have nothing for and when the nearest window opens, and how much of the catalogue is stacked on one crowded shelf. It reads the files, not our history, so it works on a catalogue you built long before you found MetaBrain. Files it could not measure are counted and named rather than quietly dropped. Expect about two and a half seconds per compressed track.
Local AI Model — Offline (App)
What it is
Instead of the cloud, the desktop App can send your files to an AI model running on your own Mac — no internet needed for processing. Your images never leave the computer, no credits are consumed, and generation keeps working when your connection drops.
Available in the macOS App only (not Studio), on the Pro plan. You need one helper program that runs the model — the easiest is LM Studio (everything by mouse, no Terminal), the alternative is Ollama.
Which model fits your Mac?
First check how much memory your Mac has: Apple menu () → About This Mac → the Memory line. The rule of thumb: the model should take up no more than half of your Mac's memory. All models below are vision models (they understand images):
- 8 GB — Qwen2.5-VL 3B, the only comfortable option. LM Studio search: `qwen2.5-vl-3b` · Ollama: `ollama pull qwen2.5vl:3b`. Close other apps while processing.
- 16 GB — Qwen2.5-VL 7B, the recommended choice for most users. LM Studio: `qwen2.5-vl-7b` · Ollama: `ollama pull qwen2.5vl:7b`.
- 32 GB — Gemma 3 12B, noticeably better quality. LM Studio: `gemma-3-12b` · Ollama: `ollama pull gemma3:12b`. Or stay on 7B if you prefer speed.
- 64 GB and up — Qwen2.5-VL 32B or Gemma 3 27B, the best quality a local model can give, but slower. LM Studio: `qwen2.5-vl-32b` · Ollama: `ollama pull qwen2.5vl:32b`.
The newer the chip (M1 → M4) and the higher its class (Pro / Max), the faster the generation. When in doubt, start small — you can always download a bigger model later.
The easy way: LM Studio — 5 steps, no Terminal
1. Go to lmstudio.ai, download LM Studio for Mac, drag it into Applications and open it.
2. Click the magnifying glass (Search) and type the name of the model picked for your Mac above — for most users that is `qwen2.5-vl-7b`. Download the MLX 4-bit build.
3. Open the Developer tab (the `>_` icon in the left sidebar). In the selector at the top, pick the model you just downloaded so it loads — this step is easy to miss, and without it the server is empty.
4. Press Start Server. You should see it running at `http://localhost:1234`.
5. In MetaBrain: Settings → Local AI model → toggle on. Leave Endpoint URL exactly as pre-filled (`http://localhost:1234/v1`) and leave Model name empty.
Check it works: drop one photo and process it. If your credit counter does not go down, the file was processed on your Mac.
Alternative: Ollama (uses the Terminal)
1. Install Ollama from ollama.com and open it — its server starts automatically in the background.
2. Open the Terminal app and run the Ollama command for your Mac from the list above, e.g. `ollama pull qwen2.5vl:7b`. Wait for the download to finish.
3. In MetaBrain settings set Endpoint URL to `http://localhost:11434/v1` and Model name to exactly what you pulled, e.g. `qwen2.5vl:7b` — with Ollama this field is required.
What runs locally — and what stays in the cloud
Locally: Modes A, B, and C, Regenerate and Ground Truth corrections, vectors (converted on-device), and videos — the 5-frame collage is built on your Mac and analysed by your local model.
Still cloud-based: Trend Score (local results simply have no trend badge), Mode D batch-grid analysis, and the Correction Intelligence advisor. Signing in and syncing history or keyword blocks also needs a connection — but if the connection drops mid-session, local processing keeps going.
Quality, speed & troubleshooting
Expect 1–3 minutes per file on a laptop — the whole model runs on your processor; that is normal. A 7B model is also noticeably weaker than the cloud pipeline with its extra quality gates — expect shorter keyword sets and more manual review.* The cloud remains the recommended default for final production work; the local model shines for drafts, sensitive material, and offline sessions. Before a session, close heavy apps — the model needs 5–6 GB of free memory.
- "Endpoint not reachable" — the local server is not running. LM Studio: Developer tab → Start Server. Ollama: open the app.
- "Did not return valid JSON metadata" — the model is text-only or too small. Use a vision model such as Qwen2.5-VL.
- Very slow or the Mac freezes? Take the smaller 3B model.
Getty & iStock Vocabulary
Why Getty and iStock are different
Most agencies accept whatever words you write. Getty Images and iStock do not: every submission is matched against their own controlled vocabulary, and a term that is not on that list is discarded without a word. In ESP the unmatched words come back red and you fix them by hand, one chip at a time.
What MetaBrain does about it
Nothing to switch on. Whenever you export one of the seven Getty or iStock profiles - Getty Creative, Getty Creative Video, Getty Editorial, iStock Image, iStock Video, iStock Illustration, iStock Editorial - your keywords are prepared for that vocabulary first, in the desktop app and in Studio alike.
Your wording becomes theirs. "workout" is exported as Exercising, "cellphone" as Mobile Phone, "checkup" as Medical Exam.
Words with several senses are settled for you. Getty holds "crane" twice, as Crane - Machinery and as Crane - Bird. The choice is made from the title and description of that specific file, so you are not clicking through options - which is the work you came here to avoid.
It costs a second or two on a Getty export and nothing on any other, and it happens silently: you asked for a CSV, not for a report on how it was made.
What it does not promise
One vocabulary serves both collections, so a set matched for Getty is the set iStock accepts.
A term the vocabulary has no entry for is left exactly as you wrote it rather than deleted. An unusual or very specific word can therefore still come back unrecognised in ESP, and you remove it there. In everyday work that is the exception rather than the rule.
You need to be signed in. If the server cannot be reached the export still runs, with your keywords untouched - a vocabulary problem never blocks a delivery. Included on every plan, the free one as well.
Export Options
① Copy to Clipboard
Copies the title, category, description, and all keywords for a single image as formatted text. Paste directly into the agency upload form.
② Export to CSV
Exports results as a CSV file formatted exactly for a specific stock agency. Available profiles:
- Shutterstock — Filename, Description, Keywords, Categories, Illustration, Editorial
- Adobe Stock — Filename, Title, Keywords, Category (numeric), Releases
- Getty Creative (ESP) — 13-column ESP: file name, title, description, keywords, location fields
- Getty Creative Video (ESP) — same ESP; poster timecode instead of created date, no color column
- Getty Editorial (ESP) — same ESP + personalities field (names of recognizable people); editorial caption
- iStock (ESP) — identical to Getty Creative Image
- iStock Creative Video (ESP) — identical to Getty Creative Video
- iStock Creative Illustration (ESP) — identical to Getty Creative Image
- iStock Editorial Image (ESP) — identical to Getty Editorial
- Alamy — Alamy Image Ref ⚠️, Filename, Caption, Tags (semicolon-separated), Date Taken, Location, Country
- Dreamstime — Filename, Image Name, Description, Category 1–3, keywords (quoted), Free, W-EL, P-EL, SR-EL, SR-Price, Editorial, MR doc Ids, Pr Docs — upload CSV only AFTER images appear in Unfinished
- Depositphotos — Filename, Description, Keywords, Editorial, Nudity
- Pond5 — OriginalFilename, Title, Description (max 500), Keywords, Price, Editorial, City, Region, Country
- 123RF — oldfilename, 123rf_filename, description, keywords, country
- Pixta — ID (empty for new), File name, Title (max 100), Keyword, Comment
- Freepik — File name; Title; Keywords; AI-generated Prompt (blank, MetaBrain does not claim AI generation); Model (blank) — semicolon-delimited file, keywords inside comma-separated, max 50
- Archive / All fields — all MetaBrain fields in one file; not for direct platform upload; use for archiving or custom workflows
⚠️ Alamy Image Ref must be filled manually from your Alamy Image Manager account — Alamy assigns this unique ID when you upload your image.
⚠️ Pond5: upload via contributor.pond5.com → Uploads → Apply CSV (not FTP). Select media type first.
⚠️ Dreamstime CSV works for IMAGES only — video CSV returns "must be in JPG format" due to a known Dreamstime platform bug. Enter video metadata manually on their website.
⚠️ Zoonar does not use CSV import — use XMP Sidecars instead (Zoonar reads IPTC metadata embedded in the file).
ℹ️ Getty / iStock: these agencies accept only keywords from their own list, so the file we build for them is adapted to it. A full match is not guaranteed — a few keywords may still come up unrecognised in ESP, and you can simply remove them. We keep improving the match.
③ Export to Word (.docx)
Creates a formatted .docx document with one section per image. Useful for agencies that require documents, or for sharing with editors.
④ Save XMP Sidecars (.xmp)
Creates a .xmp sidecar file alongside each source image. Read by Adobe Bridge, Lightroom, Capture One, and most DAM software. The recommended method for professional workflows — metadata travels with the file without modifying the original.
⑤ Write metadata into the files themselves
In Studio (any browser, including Windows): JPEG. Export Results → Write metadata into photos. The title, description and keywords are written into the picture itself as IPTC and XMP — the same fields Shutterstock, Adobe Stock and Getty read when you upload. No CSV to apply afterwards, no separate tagging tool.
Where the files go. If you picked a folder in Settings → Export, the tagged photo is written straight back over the original, exactly as the desktop app does. Otherwise tagged copies are downloaded. Choosing a folder needs Chrome or Edge; Firefox and Safari fall back to downloads.
What is preserved, and what is replaced. EXIF, GPS and the colour profile are left untouched — the camera model, the shoot date and the coordinates stay in the file. Writing twice does not duplicate anything.
One exception, and it is deliberate: if the photo was tagged before and carries a description in EXIF as well, that one is brought in line with the new text. Otherwise a viewer that reads the caption from EXIF would show you the OLD description next to the new title — the file would contradict itself.
What Studio does not write yet: PNG, TIFF and WebP, and video. Those still need the desktop app — or use XMP Sidecars, which carry identical metadata for any format. For video the metadata must go into the QuickTime atoms, not just XMP, or the agency silently drops it; that is why we do not pretend otherwise.
In the desktop app (macOS): JPEG, PNG, TIFF and WebP, plus a sidecar for formats that cannot hold metadata (RAW, EPS, SVG).
⚠️ Writing into a folder modifies your original files. Keep a backup.
⑥ Upload to Stock Agencies (FTP/SFTP) — Desktop App only
Available in the macOS desktop app only — Export Results → Upload to Stock…
Delivers the finished files straight to the agency, without a browser. Supported: Shutterstock (FTPS), Adobe Stock (SFTP), Pond5, Dreamstime, Depositphotos and 123RF (FTP) — and, in beta until each has delivered live, Alamy, Envato Market (VideoHive, AudioJungle), BlackBox (footage), Lori, Freepik, Vecteezy, Canva, Storyblocks and MotionElements. Freepik, Vecteezy, Canva, Storyblocks and MotionElements issue the server in your own contributor panel: paste it into the Server field as it is shown there (host, host:port or sftp://host:port). Other server sends to any FTP, FTPS or SFTP server you have — an agency we do not list, a client's server, your NAS; no agency rules are checked there. Getty and iStock are not here on purpose — they have no self-serve FTP for contributors; you upload in ESP and bring the metadata in with our Getty/iStock CSV.
Your files never move. A file delivered to every agency you ticked gets a green Finder tag Uploaded and stays exactly where it was — so Bridge collections, Lightroom links and the paths in a CSV you already exported all keep working. The tag is searchable in Finder (tag:Uploaded) and you can strip it with a right-click. The dialog also tells you how many of the files in front of you already carry it. A file delivered to only some of the selected agencies is NOT tagged. If you prefer the old behaviour, a separate checkbox moves delivered files into an _UPLOADED subfolder; it is off unless you turn it on. On network volumes and non-Mac filesystems the tag may not be storable — the delivery still goes through, only the mark is skipped.
Embed metadata before upload (on by default) writes the title, description and keywords into the files first, because agencies read the metadata from the file itself over FTP. A file whose embed fails is NOT uploaded — a delivery with empty metadata is worse than no delivery.
Vectors go where each agency wants them. Alamy files an EPS together with its same-name JPEG in its Vectors folder. Dreamstime takes an EPS only after the JPG is accepted, renamed to the image ID it gets — so the app sends the JPG and holds the EPS back with that reason instead of sending a file that would be refused.
A dropped connection is not a failed upload. If the link breaks mid-file — VPN, hotel Wi-Fi, a sleeping router — the app reconnects on its own and continues the file from where it stopped; a server that cannot resume gets it again from the start, and the size on the server is checked after every file. The row shows "connection lost · retry in N s" while it waits. If the network is gone for good, the batch stops with that reason instead of failing file after file.
Passwords are kept in the macOS Keychain, never in plain text, and are typed once. Three agency quirks worth knowing: Adobe Stock needs a separate SFTP password generated in the contributor portal — generating a new one invalidates the old, so re-enter it here (the fields save on their own); Pond5 likewise needs its own FTP password from the dashboard, not your site login; Dreamstime wants your numeric member ID as the username, not your login name.
Test checks both the login and the data channel, because a firewall, a NAT or a TLS-intercepting antivirus can let you log in and still block the transfer itself. If the connection is intercepted, tick "Skip TLS certificate check".
History
What is saved
Every successful generation is saved to your account history on the server — metadata plus a small preview thumbnail. History follows your account: process in the App, review in Studio, or the other way round.
Accessing history
History opens on the Hobby plan and above. Results are saved on every plan, so after an upgrade your latest generations are already there. Studio → History page; App → Settings → View History. Both show your latest 50 generations. Click any entry to restore the full result to the current session — keywords, title, description, category.
Note: in Mode D, a card is written to history when you press Save in its detail window.
Referral Program
How it works
Every MetaBrain account has a unique personal referral link. Share it with a friend. When they sign up and make their first payment, both of you automatically receive +200 credits — no manual steps required.
Where to find your link
Open Studio → Settings (gear icon ⚙). Scroll down to the Referral Program card. Your personal link looks like:
`https://metabrain.online/r/MB-XXXXXXXX`
Click Copy link to copy it to your clipboard.
Tracking
The Referral Program card shows live stats:
- Signups — how many people registered using your link
- Paid — how many of them made their first payment
- Credits won — total bonus credits you have earned
Rules
- The +200 bonus is awarded to both parties after the referred user's first payment (any plan or credits pack).
- You cannot refer yourself.
- The referral link is valid for 30 days after a friend clicks it — they must register within that window.
Portfolio Analytics (Pro, beta)
What Portfolio Analytics does
Portfolio Analytics (the "Portfolio Coach") is your personal stock mentor. It looks at your entire published portfolio on Shutterstock, compares it with what the agencies are actually asking for right now — their live creative briefs — and turns that into a concrete action plan: what to fix, what to shoot next, and which themes bring views and sales. The report refreshes every month, so it keeps up with demand. It is a Pro-plan feature and currently in beta.
Connect your portfolio in one click
Nothing to install — no browser extension, no API keys, no "special" links — and it works in any desktop browser (Chrome, Safari, Firefox, Edge).
1. Open metabrain.online/studio → Portfolio Analytics and press Generate my button.
2. Drag the "MetaBrain Sync" button to your browser's bookmarks bar (press ⌘⇧B / Ctrl+Shift+B if the bar is hidden).
3. Open your contributor dashboard at submit.shutterstock.com (you are already logged in) and click the bookmark.
4. It collects your catalog and your all-time sales automatically — a small counter shows progress — then come back to the Analytics page and the report builds itself.
Click the bookmark again anytime to refresh. Until you click it, nothing is collected or stored.
What the report contains
Once processed, the coach report includes:
- KPIs — lifetime revenue, downloads, revenue-per-download (RPD), dead-weight share, and average keywords per file.
- Charts — revenue by month, uploads by month, format mix (photo / video / illustration / vector), and selling vs dead weight.
- Agency brief coverage — how much of each live agency brief your keywords already cover, with links to the sources.
- Demand gaps — themes the agencies want that your portfolio is missing, each with a generated example shot.
- Your shot plan — concrete shooting assignments matched to demand, with example titles and keywords, exportable to PDF.
- Files to fix first — your weakest files (thin keywords, short descriptions) with a one-click "Fix in Studio".
- The coach verdict — a plain-language summary plus a monthly quota (new uploads, video clips, files to re-keyword).
Is it safe? What gets stored?
Yes — here is exactly how it works:
- The button runs on your own Shutterstock page under your own session, as if you opened your dashboard yourself. It never sees or sends your password.
- Only aggregated numbers leave your browser: counts, keyword frequencies, monthly totals, per-file sales summaries. Never your images, your catalog files, or full statements.
- That data is stored on MetaBrain's own servers (where your account already lives), sent over HTTPS, tied only to you, and used only to build your report. We never sell it, share it, or train models on it.
- You stay in control: "Disconnect portfolio" deletes all collected data and reports from MetaBrain at any time. Your Shutterstock portfolio itself is never touched.
- The button's code is open and self-contained — you can read all of it in the bookmark; nothing is hidden and nothing loads from elsewhere.
Refresh, re-scan & good to know
The coach re-checks your portfolio automatically every month. You can also press Re-scan now on the report (once per day), or just click the bookmark again to push fresh data. Recommendations are built from public agency briefs and your portfolio composition — they improve your odds of being found, but no income is promised. Portfolio Analytics is included in the Pro plan and is currently in beta.
FAQ
Why does processing sometimes take longer?
Processing time varies with AI provider load and content complexity. Images typically take 5–20 seconds; videos take longer — frames must be extracted and a larger payload analysed, so long clips can take a few minutes. Transient errors are retried automatically.
Can I process RAW files?
Not directly. Convert RAW to JPEG or TIFF first. Lightroom users: export a JPEG, process it in MetaBrain, then import the XMP sidecar — Lightroom applies the metadata to the original RAW.
What file formats are supported?
Images: JPEG, PNG, TIFF, WebP
Vectors: EPS, AI, SVG — in both the App and Studio (Studio converts EPS/AI on our server automatically; the desktop App needs Ghostscript installed locally)
Video: MP4, MOV everywhere; AVI, MKV, WebM in the App; WMV, M4V, MTS, MXF additionally via drag-and-drop in Studio
Audio: WAV, AIFF, MP3, M4A, AAC, FLAC, OGG — in both the App and Studio
HEIC is not supported — convert iPhone shots to JPEG first.
Studio says it cannot decode my video — why?
No browser decodes professional codecs such as ProRes; Studio names the exact codec in the error message. Drop the H.264 proxy your editor already writes and set "Master file name" in export so the CSV names the master, or transcode a copy with Shutter Encoder or HandBrake (free on Windows, macOS and Linux).
Are my images stored on your servers?
Files are processed in memory and never stored permanently. What we keep is the generated metadata (title, description, keywords) and a small preview thumbnail in your history — so you can restore past results.
Why do I sometimes get fewer keywords than my target?
By default the keyword count is a quality ceiling, not a quota: semantically duplicate terms are removed*, and narrow subjects simply have fewer genuinely relevant terms. If you need an exact count, enable the strict-count option in Output Settings.
Do unused credits roll over?
Your plan's monthly allowance starts again on each billing date, and whatever is left of it does not roll over. Bonus credits — the free credits you get at sign-up, Credits Packs and referral rewards — never expire, carry over from month to month, and are spent only after the monthly allowance runs out.
How do I cancel my subscription?
Settings → Cancel subscription, confirm — done. Cancellation is immediate and self-service; your plan stays active until the end of the paid period, then the account reverts to Free. Your data, history, and remaining pack credits are kept.